Fusion 360 Make Parts Browser Transpearant Again
10 Ways to be More Productive in Fusion 360
Get Quicker Results with These Fusion 360 Tips

Autodesk released Fusion 360 in 2013. Information technology was the first cloud-based architectural software that brought together every aspect of the project workflow. Usable on mobile devices, the software allows collaboration with all involved in a project. This includes architects, construction crews, and cardinal stakeholders.
Information technology is also one of the nearly comprehensive digital design software available. It allows users to do everything from creating designs through to fabrication. This extends to performing testing and simulation routines for designs.
Farther, the subscription model proves beneficial in several ways. It lowers the immediate price of using the software. Better yet, it ways that users don't accept to pay for updates. Instead, you get access to new features equally soon as Autodesk releases them.
Though a relatively new histrion in the market, Fusion 360 has fabricated a lot of waves. This has led to plenty of people adopting the software. Those new to the software sometimes struggle to create efficient workflows. This is often due to a lack of familiarity with its features. With these tips, you can improve your Fusion 360 workflow and become the well-nigh out of the software.
Tip #i – Picking Multiple Selections

Working with selections can evidence difficult in Fusion 360. The same is true of most digital pattern software. It's one of the mutual difficulties of working with 3D models on a 2D screen.
Fusion 360 allows you to select multiple parts of a model to apply a command to. For case, you may accept several points where you desire to create extrusions. It's elementary to select these points. Yous select the extrusion tool and click each point with the mouse. But, what if you miss one?
The software tin help. Instead of having to waste time selecting every object once again you tin can employ a key to add new selections to the electric current set up. This is the Control key for Macs and Ctrl fundamental for PCs. While holding the primal, click on the object. This will add together information technology to your set. You tin utilize the same technique to remove objects from the set. Fusion makes the changes when you lot release the Command or Ctrl key.
This proves very useful when selecting a lot of objects at once. Information technology prevents you from having to get back and start over again if y'all make a mistake.
Tip #two – Creating Parameters
A lot of Fusion users discover that they have a few sets of common parameters. They apply them across several designs. Creating a new parameter takes time and tin become frustrating if y'all have used the parameter in the past.
The software can assist with that. You can create common User Parameters to get alongside the pre-set ones. Click the Modify choice and select Change Parameters. You should encounter a dark-green + sign. Click information technology and you can start creating a new parameter. Fusion allows you to name the parameter and set various options, such as the units used and the expression. Yous can so utilise the parameter beyond any designs that demand it.
That'due south non all. You lot can go back to edit the parameter also. In one case y'all do, whatsoever changes you make get reflected across all designs that use that parameter.
So, y'all save time in creating parameters. Farther, you save fifty-fifty more fourth dimension when making edits to those parameters.
Tip #3 – Using Select Other
We previously mentioned how difficult information technology tin be to brand selections using Fusion. This trouble gets bigger if your design has a lot of layers. It also becomes an outcome when working with complex models in loftier detail. By and large speaking, information technology gets more difficult to select the elements y'all desire to work on when there'due south a lot happening on the screen.
You tin counteract this issue with a uncomplicated control. Commencement, hold your cursor over the element that you desire to work with as best you lot can. Then, click the left mouse button and hold information technology down. This will cause a list to popular up. The list contains information about everything under the cursor.
Y'all can use the Depth option to coil through all of the elements that were under the cursor when y'all clicked. The Parent control goes into more than detail for a specific element. It lets you lot choose a face or characteristic relevant to the element.
This proves nigh useful when you have things that you notice difficult to select. For example, you lot may accept an element inside a closed box. Yous can use this technique to access the element rapidly.
Tip #4 – Easier Command Access
You can admission most of the commands you will need in Fusion using the navigational bar. This will let you lot search through the many menus that house the commands. This gets frustrating over time. You have to waste matter valuable seconds accessing commands. Yous may fifty-fifty end up spending a lot of time searching for commands you don't use often.
Fusion introduced the toolbox to brand this navigation easier. All you demand to do is press the Due south key. This will open the toolbox. Y'all can use this screen to search for the commands you demand via typing them into a search bar. Alternatively, utilize either the mouse or the pointer keys on your keyboard to ringlet through the list.
The best thing most the toolbox is that information technology allows you to option your favourite commands. Each control has an Up arrow attached to it. Click the pointer and the control gets pinned to the top of your toolbox for your current workspace. Now all you need to do is press S whenever yous need a command and select information technology straight from the toolbox.
A great way to salve fourth dimension is to set your pinned commands at the get-go of a project. That style yous can admission them at the touch of a button.
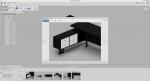
Tip #5 – Quick Access of Neutral Files

Let'south say somebody has sent a file for you to view in Fusion 360. These files can include Pace, SAT, IGES, and SMT file types. Fusion classes each of these every bit neutral files. Many people go through a convoluted method to open up these files. Subsequently opening the data panel and choosing Upload, they select the desired file. They then need to wait for the file to upload and translate earlier they can open it.
Information technology's unproblematic enough only can have a lot of time. There is a quicker way to practise it. Open the File card and select New Design From File. This will pull up a list of files you can open using Fusion. Select Open on the right file. This will load the file instantly without the need for uploading and translation.
This proves ideal when looking through a set of files somebody has sent to you. The technique allows you to quickly scan the file to see if you similar it. Better still, you don't take to waste matter much time on files that don't suit your needs.
Tip #half-dozen – Editing Advent Swatches
Fusion 360 comes with its own color palette. You can select any of these for use in your models. However, you may find that some of the colours announced inaccurate to your eye. In that location is a quick solution if that is the case. The software allows you to edit any of its pre-set colours as you lot see fit.
Fusion names its colours Appearance Swatches. You tin admission them past clicking Modify and then Appearance via the toolbar. Alternatively, printing A to access the swatches directly. You should encounter an array of colours. Alongside them, you will run into various sliders that let you to alter the colour. These range from RGB sliders to sliders for altering the colour'due south glossiness.
Select a colour and adjust the sliders to your needs. Yous tin can salvage the new swatch from hither or select a new proper name for the colour. To do the latter, apply the text field you can find on the Edit Appearance window.
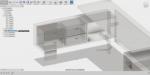
Tip #7 – Irresolute the Opacity of Components
The opacity of a component determines how hands you can see through it. When working on complex models, you may wish to see through outer layers to what lies underneath. Many use a bunch of workarounds to achieve this effect. However, Fusion actually offers a way to change a component'due south opacity quickly.
All you demand to do is correct click on the component. Y'all should come across an opacity control pop up well-nigh the bottom of the drop downwardly list. This volition allow you to make a component see-through when needed. Y'all can change this setting at any time, also.
Best of all, this works solely for the component aspect of the blueprint. When you come up to render the model, the opacity reverts to what it should be.
Tip #8 – Inserting 1 Design into Another

You may find that you want to utilize a previous design in your electric current 1. This is common if y'all accept created a pattern that is usable in several complex models. Fusion allows you to import i design into another.
First, open up the design that yous wish to import into. This is important. Opening the wrong design can cause issues after. With the correct design open, click on the Data Panel. Use this to find the design that you wish to import into your opened pattern. From at that place, correct click on the relevant design and choose the Insert into Current Blueprint pick.
Y'all should at present see the two designs together. The imported design has a link to its original file. Whatsoever changes yous brand reverberate beyond both. This can prove annoying if you lot demand to change the imported design without changing the base design.
You tin remove the link using the Data Console. Correct click the imported pattern again. You should encounter an selection to Suspension Link. Click information technology and you tin brand any edits you want in the new design without affecting the original file.
Tip #9 – Applying Constraints

About of your designs will have constraints. After all, they need to piece of work in the real world at some point. That ways you need to work within various constraints. You tin can apply constraints to various elements and pieces of sketch geography. All y'all demand to exercise is apply the Sketch Palette on the right-mitt side of the screen.
Nevertheless, this can evidence time-consuming on large products. Having to move the mouse to the Sketch Palette also disrupts your workflow. Again, the solution is correct clicking the mouse.
Just select the slice of sketch geometry yous wish to constrain. Utilise the right click to bring upward the Marking Menu and you should see a host of constraint options at the bottom of the list. The listing only displays constraints that you can actually employ to the slice of geometry you lot click on. That means you lot don't take to worry about picking the incorrect 1. Only click on your selection and the constraint gets applied without any more navigation.
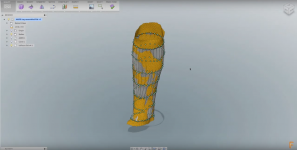
Tip #ten – Adding New Rendered Views
Fusion 360 offers a set of default views from which you can render. These are the Front, Right, Top, and Home views. You lot can click any of them to generate a render apace from the appropriate viewpoint. This is neat, but what if you want to apply another view? More chiefly, what if you desire to admission that view across several designs?
The software allows you to do just that. Y'all can create new NamedViews to become aslope the four already mentioned. Get-go, find the viewpoint that you desire to utilize. This will crave some adjusting of angles and zoom until y'all hit the sweetness spot. Now, admission the NamedViews binder and click New NamedView.
This will create a new NamedView based on the view you created in the pattern. At that place's more. You can have Fusion automatically render that view every time you save. Just render your pattern and look to the bottom-left of the screen. You should encounter the Rendering Gallery. Drag your new NamedView into the Return on Save Section and it Fusion volition create the render automatically each time you lot save.
The Final Word

So, there you have it. X great tips for helping you improve your Fusion 360 workflow. Start using them all today and you should notice that you save lots of time when working with the software.
If yous demand actress assistance, ArchiStar Academy is hither to help. We offering several courses that will assist y'all improve efficiency and your overall power in Fusion 360 .
Archistar Academy offers several courses beyond the spectrum of digital design software. Y'all'll develop your skills, allowing you to create more accurate and functional models.
Please don't hesitate to get in impact with Archistar Academy today if you have any questions.
https://academy.archistar.ai
If you would like to share your thoughts on our blog, we'd love to hear from you!
Get in touch with the ArchiStar Academy customs via Facebook.
Posted on xx January 2020
cartwrightarage1945.blogspot.com
Source: https://academy.archistar.ai/10-ways-to-be-more-productive-in-fusion-360
0 Response to "Fusion 360 Make Parts Browser Transpearant Again"
Postar um comentário